We’ve tested enough “beginner-friendly” espresso machines to be cautious when a brand promises to handle the hardest parts for you. Usually, it means one of two things: the coffee quality takes the hit, or the “help” on offer is so minimal it barely counts. So we spent weeks testing the Barista Express Impress to find out if it breaks the mold and is actually a good fit for espresso newbies.

We recommend the Barista Express Impress for beginners who want real espresso with minimal puck prep frustration. The honest caveat is that the milk side is entirely on you, and it will take a couple of weeks of practice before you’re getting consistently good results.
We already knew the previous generation, Barista Express, was a solid espresso machine. So, for this Breville Barista Express Impress review, we really wanted to dig into how good the “Impress” system was and how easy it would make at-home espresso pulling for beginners. We went through an inhuman amount of coffee beans while testing this machine – dig into all our overcaffeinated thoughts below:
This article may contain affiliate/ compensated links. As an Amazon Associate, we earn from qualifying purchases at no additional cost to you. For more information please see our disclaimer here.
At a Glance: Breville Barista Express Impress Review
Verdict: The Breville Barista Express Impress solves the thing that trips most beginners up – inconsistent dosing and tamping. By automating both, it removes the two most common reasons a shot goes wrong. This lets you focus on the one thing you actually need to dial in, the grind. The result is a floor of “pretty decent espresso” right from the start, and genuinely excellent espresso once you’ve found your settings.
The machine doesn’t do anything for you on the milk side, so that’s where the learning curve lives. With practice (and we’d recommend picking up a thermometer to help), you can get excellent microfoam from the steam wand.
Bottom line: This is a smart, well-built semi-automatic machine that makes real espresso accessible to beginners without sacrificing quality. If you’re prepared to learn the milk side, it’s hard to beat at this price (around $800 RRP).

Pros
- Automatic dosing and tamping
- 25 grind settings for precision
- Espresso quality is excellent
- PID temperature control for consistent extraction
- Less mess than most semi-automatics at this price
- Steam wand produces great microfoam

Cons
- Manual steam wand requires practice
- No water level sensor
- Can’t adjust the 30 minute auto-standby
Who It’s For (And Who It’s Not!)
✅ Buy the Breville Barista Express Impress if:
- You want to make real espresso at home, but the idea of getting dosing and tamping feels daunting. The Impress Puck System handles both automatically, so your margin for error is smaller from day one.
- You want coffee shop quality results at home. This is the machine for that – the espresso quality, once dialled in, is the real deal.
- You’re willing to put in some work. Yes, the dosing and tamping are taken care of, but the rest is up to you. There’s still a learning curve.
- You want great results without spending a fortune. At around $800, this machine can deliver amazing quality for the price.
- Mess is a concern. The auto-dosing system means far less ground coffee on your counter compared to most semi-automatics.
❌ Skip it if:
- You want café-quality flat whites from the moment you unbox the machine. The steam wand takes practice, and you’ll need a thermometer to help nail the temperature in the early weeks.
- You’re an experienced home barista who’s already confident about dosing and tamping. In this case, the Impress Puck System won’t add much to your workflow, and you’ll likely find it limiting.
- You want auto milk steaming. The next model up – Barista Touch Impress – handles that for you… for a lot more money (it costs around $1500).
- Counter space is tight. This is not a small machine.
Key Features
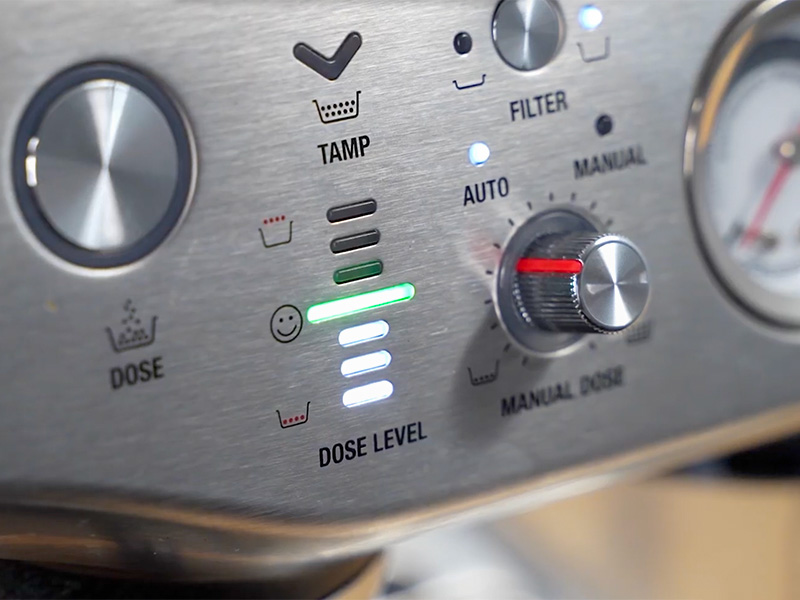
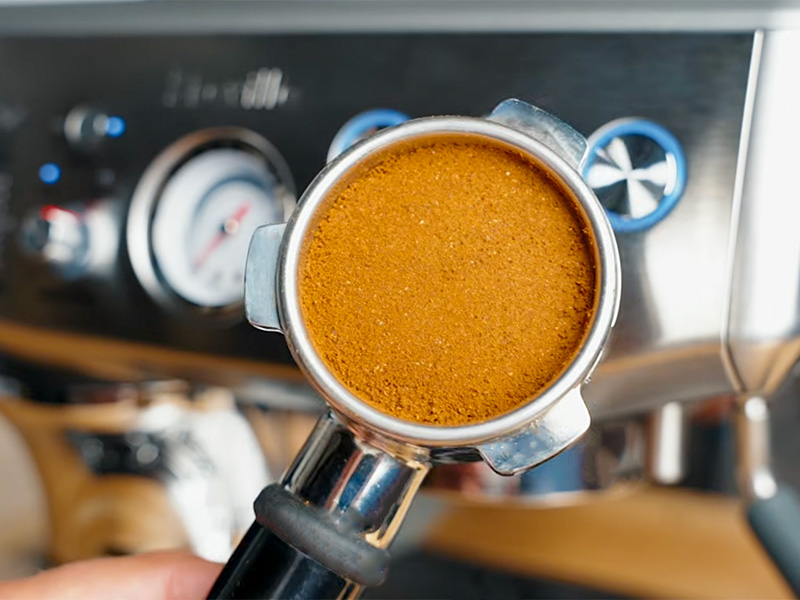
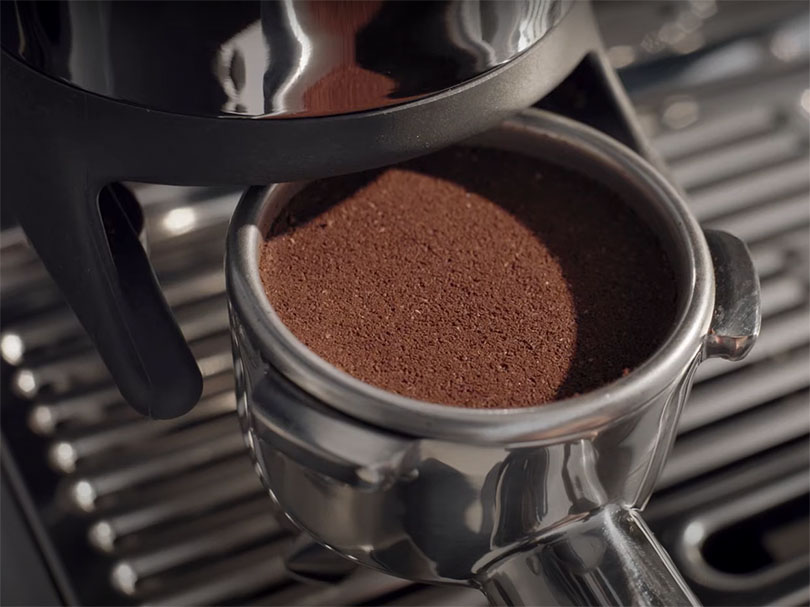
1. Impress Puck System: Automatic Dosing and Tamping
This is the reason most people buy this machine, and it’s a feature that’s fully worth the hype. After grinding, just push the lever down, and it will automatically deliver a 22lb (10kg) tamp with a 7° barista twist. Perfect pucks as easy as that.
What makes it smarter than a fixed tamper is the adaptive dosing:
The machine tracks where the tamper bottoms out in the basket and adjusts the grind time for the next shot based on what it learned. After a few shots, it consistently doses to within 0.2g. Color me impressed.
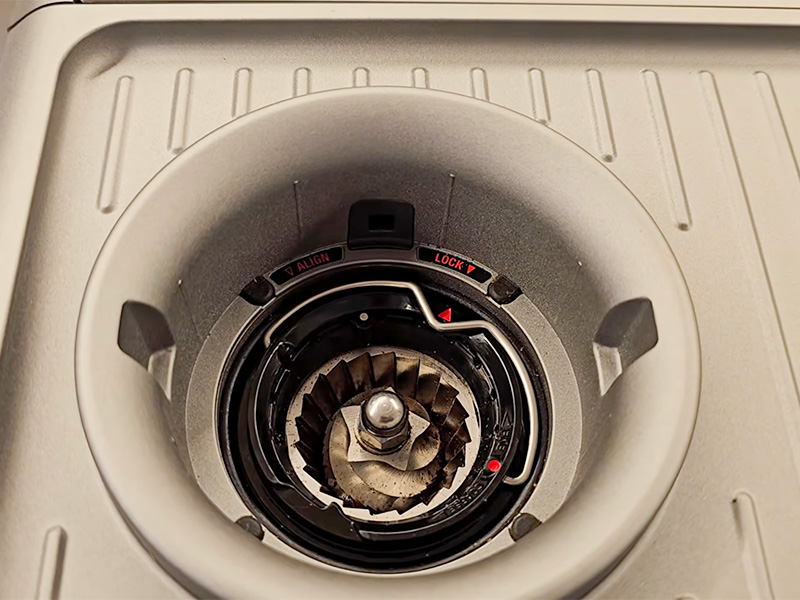
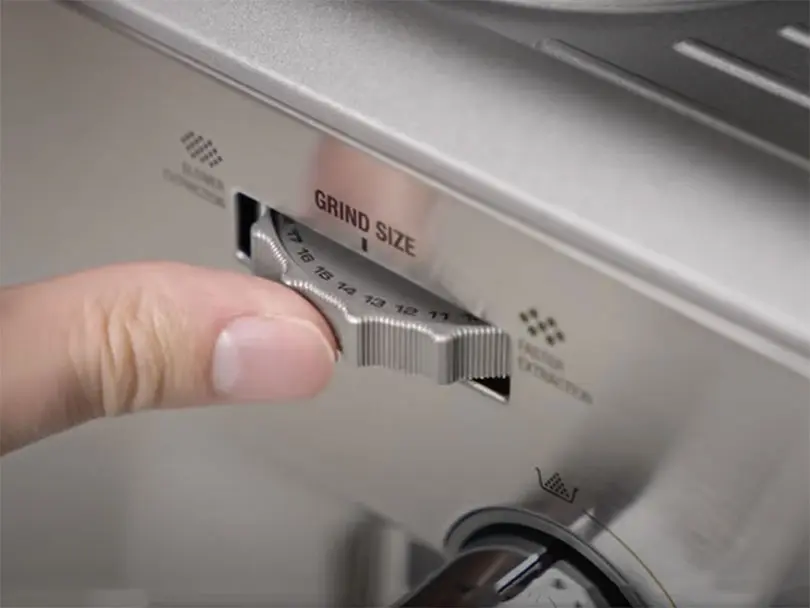
2. 25-Setting Integrated Grinder
More settings mean more control, and 25 settings (up from 15 on the original Barista Express) make it more likely you’ll find your sweet spot. Whilst some of the newer Breville machines have higher quality burrs, we never had any cause for concern with the conical burrs on this machine. The grind was always consistent and evenly distributed.
3. Adjustable Brew Temperature
Five temperature settings via a PID control is a level of precision you don’t often see at this price. PID (proportional-integral-derivative, for those who want the technical version) means the machine actively monitors and adjusts the boiler temperature throughout the extraction, not just at the start.
This means you get a more consistent shot temperature from cup to cup and more control over how it tastes.
Having said that, it’s not the easiest to adjust as it involves pressing almost all the buttons at the same time, then a complicated sequence to go up or down by either 2 or 4°C at a time. There’s also no way to read what temperature it’s set to, so you’ll have to keep a note somewhere.
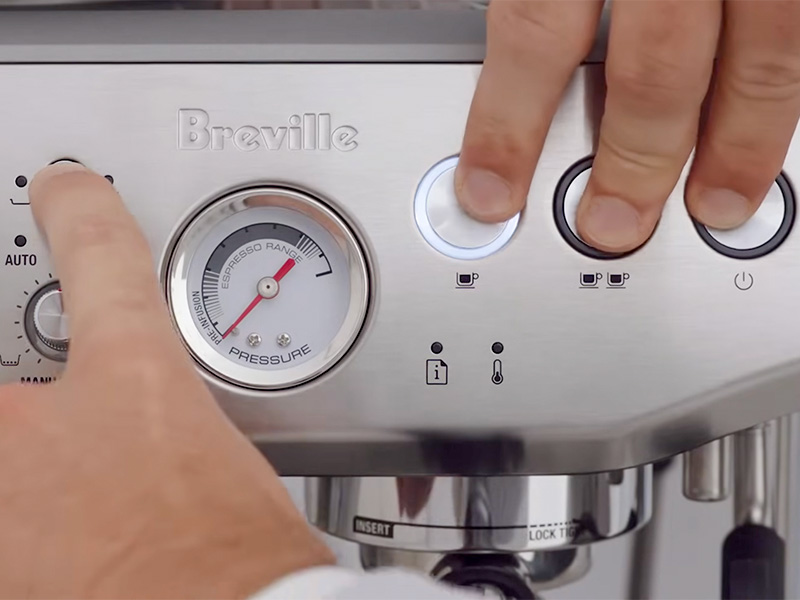
4. Volumetric Shot Control
You can either set precise water volumes for your single or double shot, or switch to manual timing and stop the shot yourself. For beginners, the volumetric setting gives you one less thing to watch. Once you’ve set the volume, the machine stops the shot automatically every time.
The pre-infusion function wets the puck before full pressure is applied. This leads to more flavor from the beans, less channeling, and better consistency.
How easy to use is the Breville Barista Express Impress?
Whilst it’s easier to use than many traditional semi-automatic espresso machines, the Barista Express Impress still requires your manual input on the milk side.
The setup process is straightforward: fill the water tank, soak and install the water filter, add beans to the hopper, and prime the pump by running water through the group head and steam wand. Breville’s instructions walk you through all of this clearly, and it took us 20 minutes to be sitting down with our first cup of coffee after opening the box.
Making espresso day-to-day looks like this:
- Select single or double shot using the relevant buttons (the machine will extract and stop automatically for your chosen size)
- Insert the portafilter into the dosing cradle
- Press the dose button: the machine will grind the coffee beans, and the indicator lights tell you when you’re at the right dose
- Pull the lever to tamp: it doses, tamps, and polishes the puck automatically
- Remove the portafilter and lock it into the group head
That process is genuinely simple and nearly foolproof on the espresso side. The light indicators (underdosed, correct, overdosed) make it easy to tell when the dose is right, and the adaptive system learns the right grind time after a while.
Switching from espresso to steam mode for milk frothing takes 15 to 20 seconds for the wand to heat up, which is noticeable but not excessive. Once in steam mode, the single-hole tip is actually very forgiving for beginners: there’s enough time while steaming to move the wand around for better or worse microfoam.
I have two specific annoyances that are worth calling out:
The water tank has no sensor, so the only way to know you’re running low is to check it yourself or hear the pump struggling for water.
And the auto-standby kicks in after 30 minutes with no option to extend it, which is frustrating if you’re planning to make several coffees in a row and the machine cools down between shots.

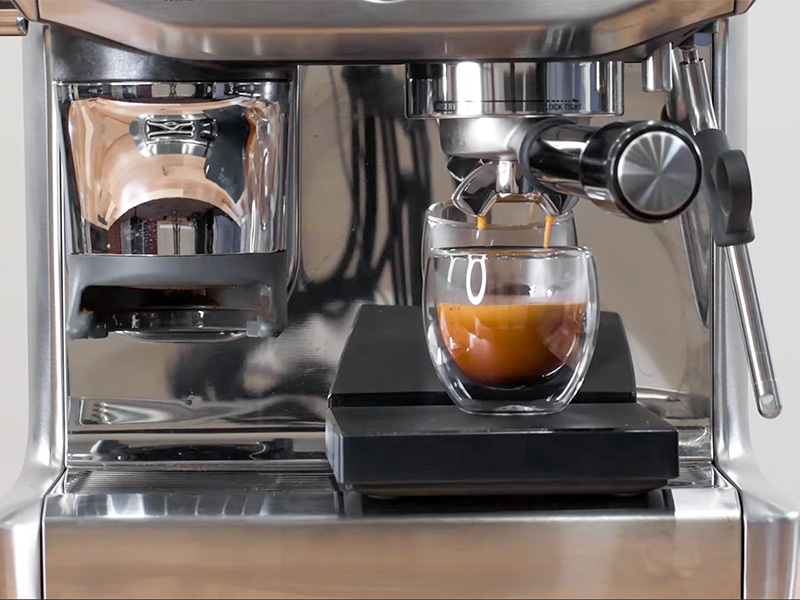
How good is the Espresso Quality?
Once you’ve dialled in the grind, you can expect very good quality espresso from the Breville Barista Express Impress.
The adaptive dosing system isn’t just a gimmick; it’s a seriously impressive bit of technology. It takes the machine a few shots to learn your dose and, after that, the consistency is excellent. The biggest variation we found between doses was 0.2g. This is the kind of consistency you would usually have to turn to a super-automatic espresso machine for, and it means you get reliably good espresso day after day.
The weakest point is lighter roasts. Anything less than a medium roast simply doesn’t respond well to this machine. We tried a light roast with the temperature setting at the highest and used the finest grind the dial would allow, but the results were noticeably less impressive. Flatter, less developed flavors, and harder to get consistent extraction from. Though this is true of all but the most premium Breville machines with higher-quality grinders.
Stick to medium or medium-dark blends for the best results.
There are buttons to choose between the double and single espresso options. So, if you are a fellow bleary-eyed coffee addict first thing in the morning, your much needed caffeine is only a few button presses away. There is ample space for a second espresso cup or, if you want a bigger sized espresso and choose the double option, you can also fit a taller standard coffee cup under the spout. We didn’t notice any taste variation when increasing from single to double shots.
Our Breville Barista Express Settings
After testing extensively with a medium-dark espresso blend, we settled on the following settings:
Grind setting 3, 18g dose in the standard double unpressurized basket, at the default 200°F brew temperature. Once the machine had adapted to our dose after a few shots, we were consistently hitting 25-second extractions.
The espresso at those settings was rich, full-bodied, and genuinely complex: well-balanced with no harsh bitterness, good crema, and a lingering finish. The kind of result that makes you wonder why you’ve been spending $8 a cup when this was possible at home.
What about Milk Frothing?
The ceiling for steamed milk quality is high, but the manual wand means you have to climb to it.
Having frothed a lot of milk in our time, we found it very easy to use. But if you’ve never done it before, then you’ll probably need a couple of weeks of practice before you start feeling confident and getting consistent results. Week one is probably going to be a little rougher than you’d like, but it’s worth persevering.
The steam wand has no feedback – it won’t tell you when the milk is at the right temperature, and there’s no auto-stop. So we’d strongly recommend picking up a basic milk thermometer. For less than $15, you’ll shorten the learning curve significantly. Aiming for 140-150°F (60-65°C) gives you a clear target and stops you from burning your milk – the most important thing.
With practice, the single-hole steam wand is capable of producing very good microfoam – silky and well-incorporated. Your technique will be different if you’re making a silky smooth flat white or a more fluffy old-school cappuccino. Either way, it’s forgiving enough that even if you’re a total beginner, you’ll start seeing decent results within a week or two.
What type of Beans should you use?
Regardless of your flavor preference, you’ll want to use whole beans to make the most of the Breville Barista Express Impress’ built-in grinder and automatic dosing and tamping system.
Even if you think talking about the tasting notes of different beans is a level above what your palate can taste, believe me when I say you’ll taste the difference in espresso quality between using stale pre-ground versus freshly ground coffee. And that’s exactly what the excellent integrated conical burr grinder takes care of. The oils and gases that give espresso its crema and complexity start to degrade within minutes of grinding.
To get the best results from the Barista Express Impress, use medium or medium-dark beans. Any darker and the oils from the beans can damage the grinder, and any lighter and the machine can’t extract the flavors well.
If you want to try something different (like a decaf) but don’t want to empty the bean hopper, you can still grind your coffee separately and put it into the portafilter manually. From there, you can still use the auto-tamp, and the rest of your workflow will be the same. As this bypasses some of the machines best features, we’d only recommend it as an occasional one-off, but not as your regular coffee.
Anytime you do change beans, be aware that you’ll need to run through a shot from the grinder and throw it away to clean it out and ensure it’s only the new beans you’re brewing with.
Breville recommends starting at grind setting 13, but in our experience that’s far too coarse for most beans. Expect to be somewhere between 2 and 5 on the outer dial, depending on your roast.
Desgin and Build Quality Review
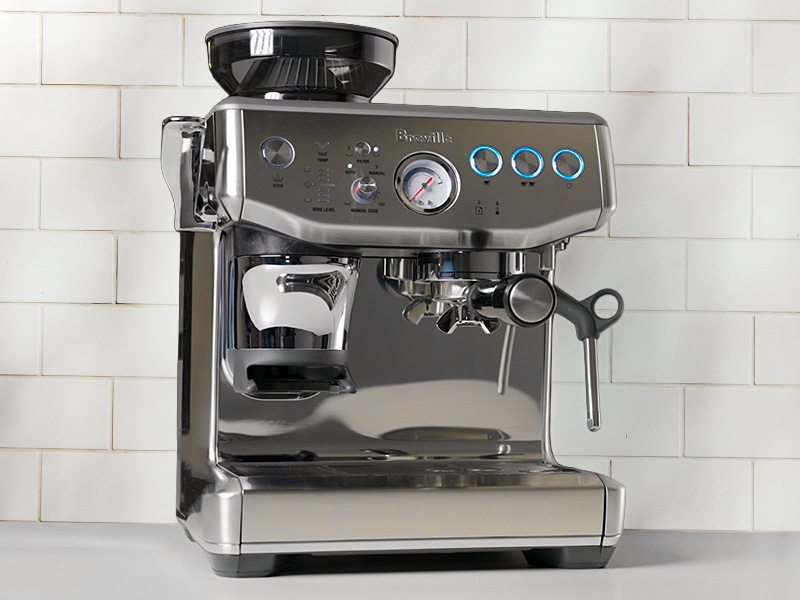
The Looks
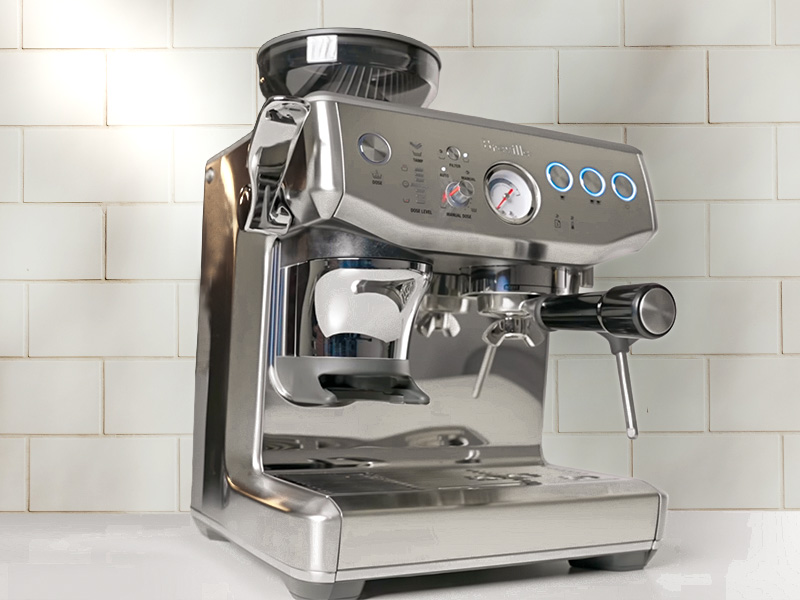
Clean, classic, and immediately recognisable as a Breville machine. The brushed stainless steel finish is timeless and fits with most kitchens. It comes in a few different colors if you’re less boring than we are, so there’s a good chance you’ll find one that’ll match your kitchen. Though you usually have to shop direct to get the full color selection.
The tamping pod on the left side of the machine is big, and I’m not the biggest fan of it. Functionally, it earns the space. But it does make that side of the machine feel a little crowded.
The pressure gauge on the front panel is one of the best design features. It adds a little “steampunk” feel to the machine, which we love. It’s also useful for dialing in your grind size, not just for looking pretty.
At 12.9″ wide by 14.9″ deep by 16.1″ tall, this is a machine that needs its own dedicated section of counter. Best to get the measuring tape out before ordering and make sure you leave enough room overhead to get into the bean hopper.
Psst… If the classic design doesn’t do it for you, see how Breville and their machines stack up against one of their top competitors, Jura:

The Build
Breville’s build quality is one of the most consistent things about the brand.
The stainless steel construction feels substantial, nothing rattles or flexes, and the portafilter locks into the group head with a reassuring firmness. The Thermocoil heating system is reliable and energy-efficient, though it doesn’t heat up as fast as the ThermoJet system on the higher-end Barista Touch Impress.
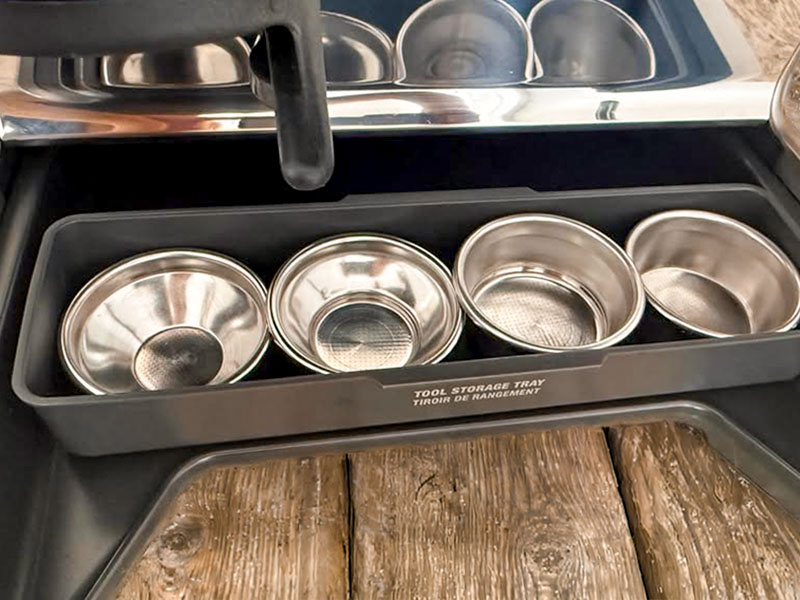
As a fan of slick design, I like that Breville includes a tool storage tray for your spare filter baskets that slots nearly inside the machine, behind the drip tray.
The 54mm portafilter is the one thing we’d change. The industry standard for prosumer machines is 58mm, and using a 54mm basket limits your options if you ever want to upgrade accessories down the line. It’s not a dealbreaker at this price, but it’s worth knowing.
The handle for the tamping system also feels very tactile. There’s a very reassuring feeling of resistance as you use it, but it doesn’t require much force. Overall, it feels extremely well designed and built.
The previous Barista Express, released around 2014, is still running in thousands of kitchens today. With regular backflushing and descaling, there’s no reason the Barista Express Impress shouldn’t last a similar length of time.
Cleaning and Maintenance Review
The Barista Express Impress is one of the easier semi-automatics to maintain at this price. The auto-dosing means less stray ground coffee escapes onto your counter, and the pucks knock out cleanly.
Your machine’s cleaning schedule should look like this:
Daily: Wipe down the steam wand immediately after use (dried milk is the enemy). Empty and rinse the drip tray. Quick wipe of the group head.
Weekly: Backflush with the cleaning disc and a cleaning tablet (supplied in the box). This takes around 5-10 minutes and is a simple automated process.
Periodic: Descale when prompted, approximately every 2-3 months, depending on water hardness and usage. It takes around 30 minutes and isn’t complex, just a little time-consuming. The machine comes with a small amount of descaling solution to get you started.
The fact that the brew group, portafilter, and group head are all fully accessible is worth mentioning. Super-automatics often hide all of this inside the machine body. With the Barista Express Impress, you can see and clean everything properly.
The Competition
There are plenty of options for espresso machines aimed at beginners who want to learn to pull shots. What varies is how much help you get, depending on how much you want to pay:
DeLonghi La Specialista Touch
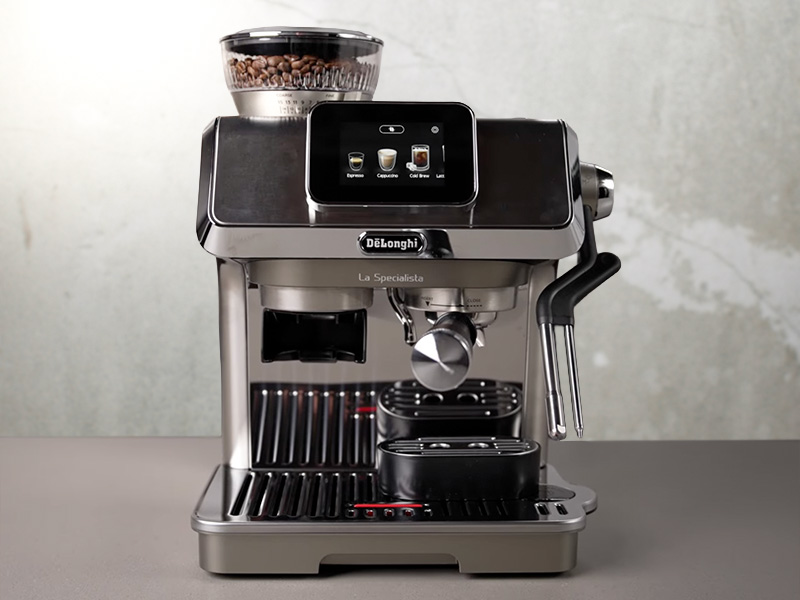
- ☕️ Espresso Quality: 8/10
- 🥛 Milk Quality: 8/10
- 📋 Drinks Options: 9/10
- 💸 Value for Money: 8.5/10
- 🏆 Overall Rating: 9/10
The La Specialista Touch is around $300 more, and it makes a compelling case for the extra spend if convenience is your priority. For starters, it has a dual boiler, which means no waiting between pulling a shot and steaming milk.
It also offers:
- Both automatic and manual milk steaming
- A 3.5-inch touchscreen
- Cold brew as a built-in function
- DeLonghi’s Bean Adapt technology, which walks you through the initial dial-in by asking about your beans and adjusting grind and dose settings based on your feedback. You can save bean profiles, so switching between bags doesn’t mean starting from scratch.
What it doesn’t have is the auto-tamp. You still tamp manually with a guided indicator showing the correct level. Perfectly usable, but it’s a notch below the Impress Puck System in terms of consistency and ease. The grinder also has 15 settings versus the Barista Express Impress’ 25, which gives you less precision when dialling in.
If milk drinks and guided assistance matter more to you than grind precision and value, the La Specialista Touch is genuinely worth the extra $300. If you’re happy to learn the milk side yourself, the Barista Express Impress gives you more for less.
![]() Read next: Our full DeLonghi La Specialista Touch review
Read next: Our full DeLonghi La Specialista Touch review
Breville Barista Touch Impress
- ☕️ Espresso Quality: 9.5/10
- 🥛 Milk Quality: 9/10
- 📋 Drinks Options: 6/10
- 💸 Value for Money: 7/10
- 🏆 Overall Rating: 8.5/10
If you’re feeling like the Breville Barista Express Impress isn’t doing enough to help you, it’s time to consider its big brother.
The Barista Touch Impress helps with everything from dosing to milk steaming. The large screen shows you every cleaning task you need to do, and it’ll help you to dial in your beans for the best espresso.
It’s all going great until you look at the significant jump in price – it costs nearly twice as much as the Barista Express Impress.
If you want to be guided through the entire espresso-making journey, this is probably the best machine out there. It even adjusts the milk steaming for different plant-based milks, so you get the ideal texture. It all depends on whether your budget can stretch to it.
![]() Read next: Our complete Breville Barista Touch Impress review
Read next: Our complete Breville Barista Touch Impress review
Ninja Luxe Cafe Pro
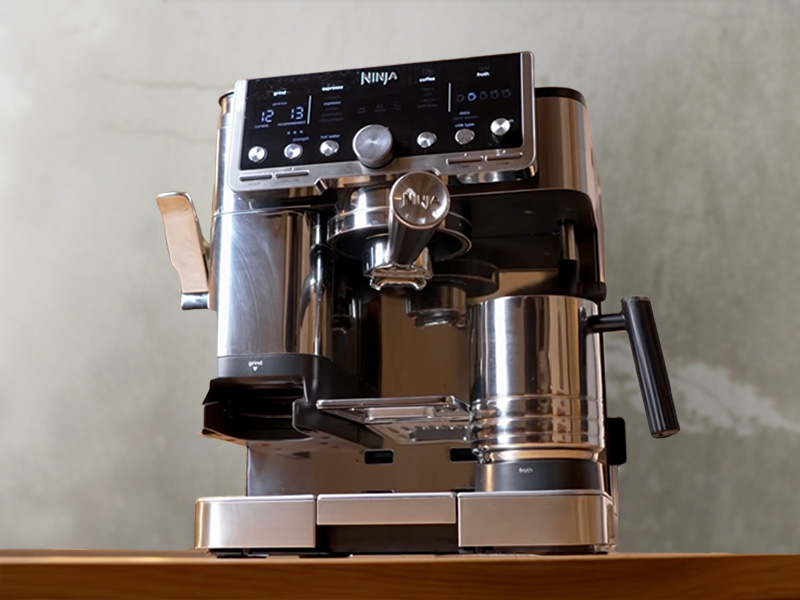
- ☕️ Espresso Quality: 8/10
- 🥛 Milk Quality: 8/10
- 📋 Drinks Options: 9/10
- 💸 Value for Money: 9.5/10
- 🏆 Overall Rating: 8/10
For something that’s closer in price but gives you more help than the Barista Express Impress, there’s the Ninja Luxe Cafe Pro. It’s a ‘4-in-1 combination machine’ that makes espresso, cold brew, and drip coffee, plus hot water for tea. All as easy as possible.
It does a pretty good job, too – except for the drip coffee, which leaves a lot to be desired.
It has an integrated grinder and scale for dosing, a tamping lever, and automated milk frothing. The cold brew drinks are seriously impressive. Plus, it’ll help you dial in the grind setting and automatically adjust it as needed when you change which drinks you’re making.
What is the downside then? Well, the espresso and milk simply aren’t as good as the Breville. You lose the complex, nuanced flavor in your espresso shots, and the milk doesn’t have as good a microfoam or as silky a texture.
Plus, it can only really handle medium-dark roast beans, otherwise the coffee tastes a bit flat.
But it’s a really impressive machine if you want lots of help without having to spend a lot of money. And if you love cold brew.
![]() Read next: Our complete Ninja Luxe Cafe Pro review
Read next: Our complete Ninja Luxe Cafe Pro review
Final Thoughts
The Barista Express Impress does something genuinely useful: it removes the two variables that cause most beginner espresso to fail before you’ve even started thinking about grind size or extraction time.
The result is a machine that produces good espresso from the off, great espresso once dialled in, and does it consistently.
The milk side requires patience. Two weeks of practice plus buying a thermometer is an honest expectation, not a criticism. You’ll get there, and the quality ceiling is well worth the effort. But it’ll take work.
If you take one thing away from our Breville Barista Express Impress review, let it be this:
Start with grind setting 3, use the double unpressurised basket, stick to a medium-dark espresso blend, and let the machine learn your dose over the first few shots before you start judging the results. The first shot from a blind start is never the best one.
Psst… the Barista Express Impress goes on sale fairly regularly, especially around the holidays. If you’re seeing it at $599 or below, don’t overthink it. At that price, it’s an exceptional buy.