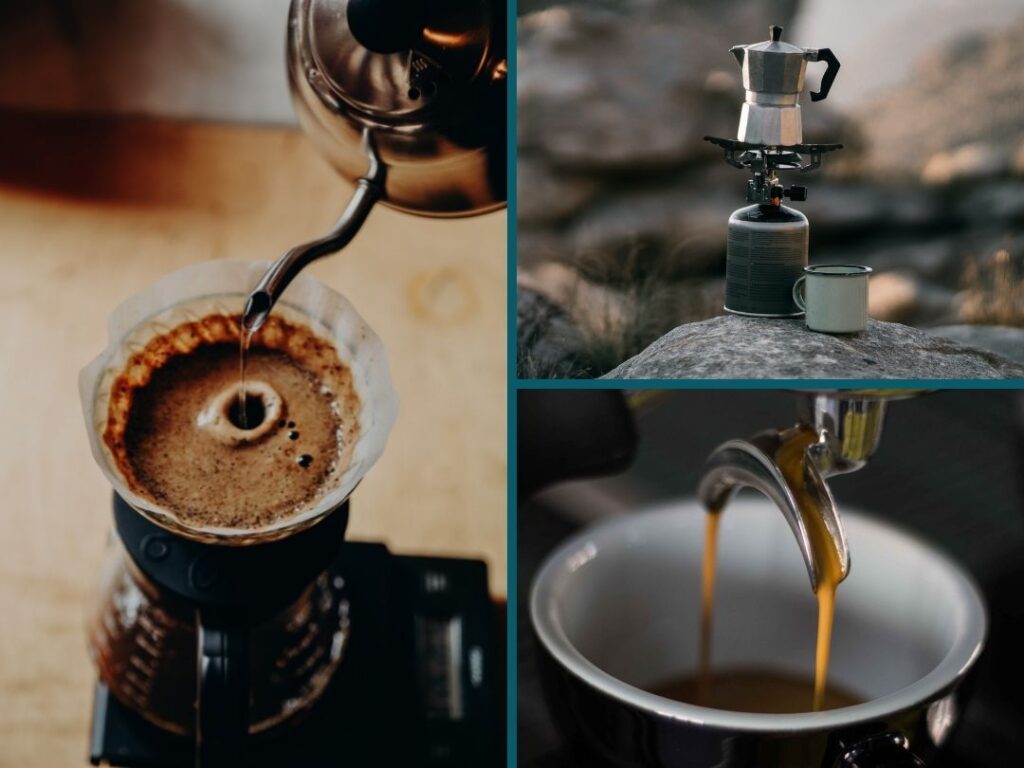
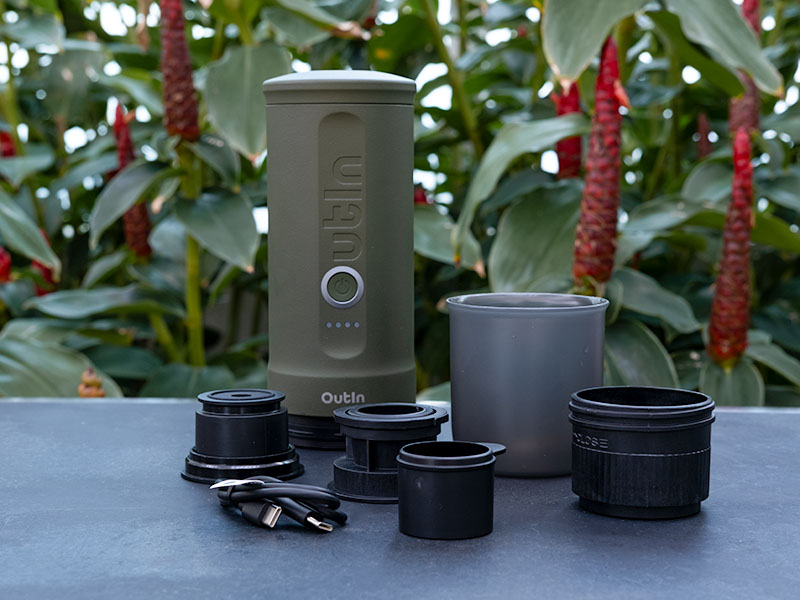
Portable espresso machines have a reputation for promising a café in your backpack but delivering warm, bitter disappointment. So when the OutIn Nano showed up with its self-heating chamber and a 20 BAR pump, we bought it expecting to be let down.
And we were both woefully let down, and had all our expectations exceeded. It’s been a rollercoaster.

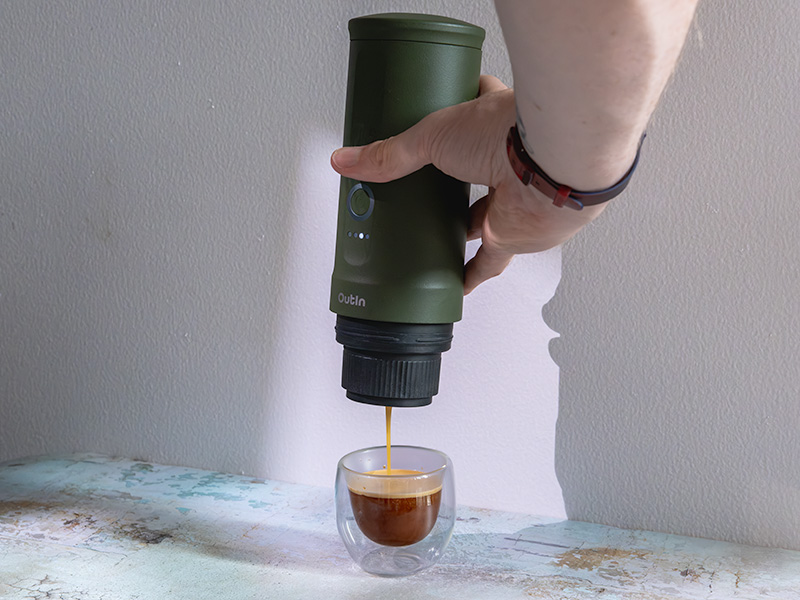
In short, the OutIn Nano is a genuinely good device for making espresso almost anywhere. It gets bonus points for being battery-powered, charging via the same cable as your phone.
As is, it performs best with Nespresso Original pods – it’s fast, clean, and almost impossible to get wrong. But if you venture into using freshly ground coffee, the setup becomes a fiddly, jam-prone chore. All the problems we had with this travel espresso maker can be fixed by buying the Basket Plus add-on – then it becomes an impressive, simple device to use at home or whilst traveling.
This is for you if you want proper-ish espresso at the top of a mountain, from your hotel room, or sitting on a park bench. If you want to dial in single-origin beans at home, read the caveats carefully before you spend. We’ve been fighting (and sometimes winning) to make espresso with the OutIn Nano for a few weeks, and everything we’ve learned is below:
This article may contain affiliate/ compensated links. As an Amazon Associate, we earn from qualifying purchases at no additional cost to you. For more information please see our disclaimer here.
At a Glance: OutIn Nano Review
Verdict: A properly portable espresso machine that nails the pod experience and heats water (still a relatively rare feature). But it’s let down by an awkward ground-coffee workflow that really needs a paid upgrade to fix.
If all you want is to drink Nespresso pods anywhere, then the Nano is pretty perfect – nice and easy to use.
As soon as you’re grinding your own coffee and trying to get a legitimately good shot, it becomes super frustrating and easily jams. You need to get the Outin Nano Basket Plus accessory to make it worthwhile. But this pushes the price beyond what we really think the device is worth. That said, with the larger, unpressurized basket, you can pull very impressive shots with the right setup.
Store-bought pre-ground coffee falls somewhere in between the two extremes. Easier, but still not great.
Bottom line: Buy it for travel and to use Nespresso pods, and you’ll love it. Buy it to grind and dial in at home, and you’ll be buying the larger basket add-on within a week.

Pros
- Near foolproof when using pods
- Heats water in a few minutes
- Hundreds of shots per charge when you heat the water separately
- Relatively light (1.5lbs / 670g)
- Pressurized basket gives good crema
- Rechargeable (USB-C)

Cons
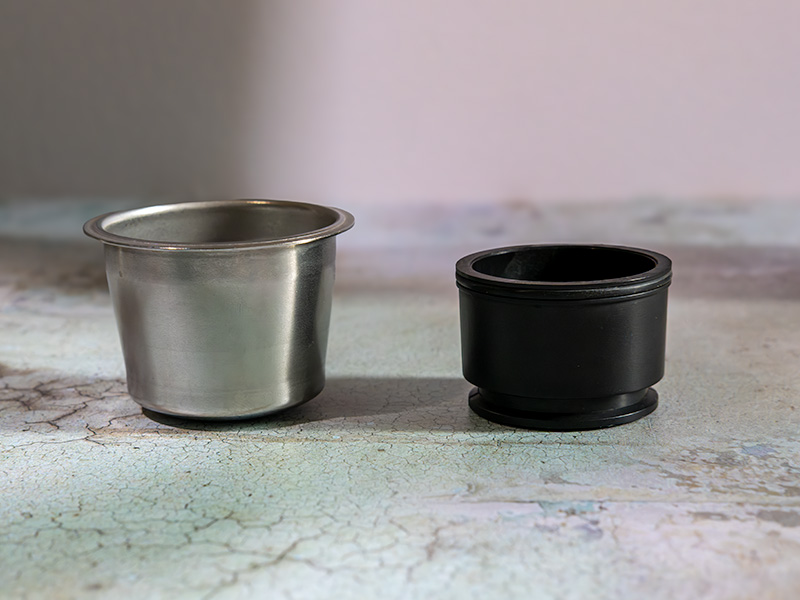
- 6-8g basket is too small for good flavor extraction
- No dosing funnel means it’s messy to get coffee from grinder to the basket
- Jams easily
- Needs $40 upgrade to pull good espresso
Our Ratings
Who It’s For (And Who It’s Not!)
✅ Buy the OutIn Nano if:
- You drink Nespresso pods and want that same quality when you’re away from home – hotels, the beach, hiking trails, campsites, or just a long walk. If this is you, the Nano is close to perfect.
- You travel with a grinder and accept that you’ll have to buy the larger basket to make it work. With that add-on fitted, it becomes a very good little espresso maker you can take anywhere and get high-quality espresso shots.
- You use pre-ground coffee and want espresso in your RV. The Nano is small, lightweight, and relatively easy to use with store-bought pre-ground coffee (as long as it’s been ground for espresso). It’s a little messy, but an otherwise good solution for van-lifers.
❌ Skip it if:
- You’re serious about coffee and want this as your home espresso machine. With the Basket Plus add-on, the potential shot quality is good. It’s just that there are far better ways to spend this kind of money if it’s going on your kitchen counter.
- You want to make coffee for multiple people. Making more than 1 shot is time-consuming, especially if you’re getting the Nano to heat the water. Making 4 or more is insane.
- You’re an espresso purist. With the unpressurized basket in the additional Basket Plus kit, you can get some very good shots from the OutIn Nano. It’s just not the best value option for this – the Wacaco Pixapresso can do much more, for a little less money.
Key Features
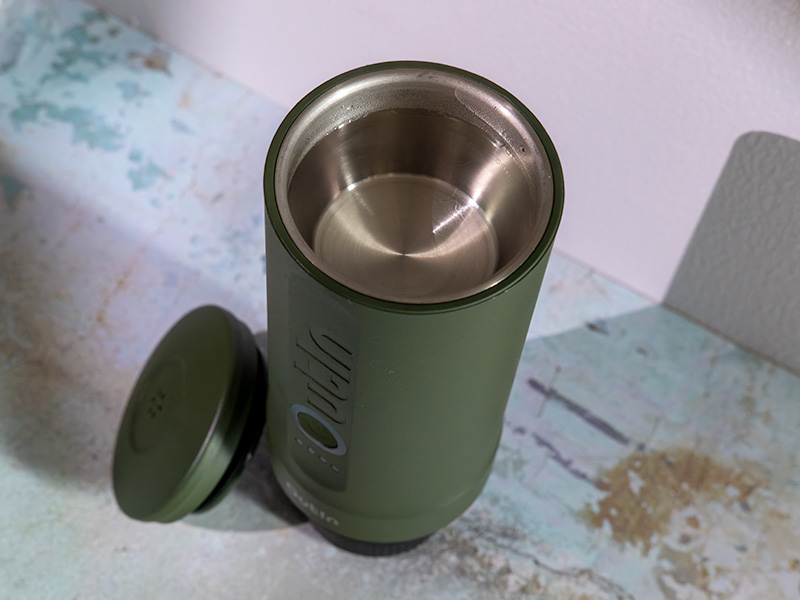
1. Self-Heating Chamber
The Nano heats its own water, so you don’t need a kettle, stove, fire, or a power outlet to get a hot shot. Pour cold/ room temperature water in, hold the button, and it warms the chamber for you before brewing.
From room temperature, it usually took 2.5 minutes for us to heat 70ml of water (less than full capacity, but our preferred amount when using the Basket Plus). It also starts brewing as soon as the water gets hot enough, so you need to be prepared with the cup underneath and not zone out like I’m guilty of.
Doing this takes a lot of battery, though, so you’re limited to 3-5 shots per charge (we averaged 4).
But it’s this feature that makes the Nano properly portable, not just easily packable. Most portable devices still need you to have a way of boiling water – the thing that’s hardest to find when you’re out. We’re starting to see more battery-powered coffee makers these days, but it’s still not common. And certainly not common to find one that does it well.
2. Up to 20 BAR Pump
You only need 8 BAR for espresso, but having a forceful pump ensures you get the pressure in the basket you need for genuine espresso. This is the difference between getting sort-of-strong coffee and rich, flavorful espresso.
3. Pod and Ground Coffee Compatibility
You can run it two ways: drop in a Nespresso Original pod, or load the basket with your own ground coffee (ground fresh or store-bought). That means you can keep things effortless on a trip and still grind fresh at home if you want to.
The pod compatibility makes this machine insanely easy to use. The ground coffee can be fiddly and annoying, especially if you’re grinding it yourself, but it’s good to be able to do both.

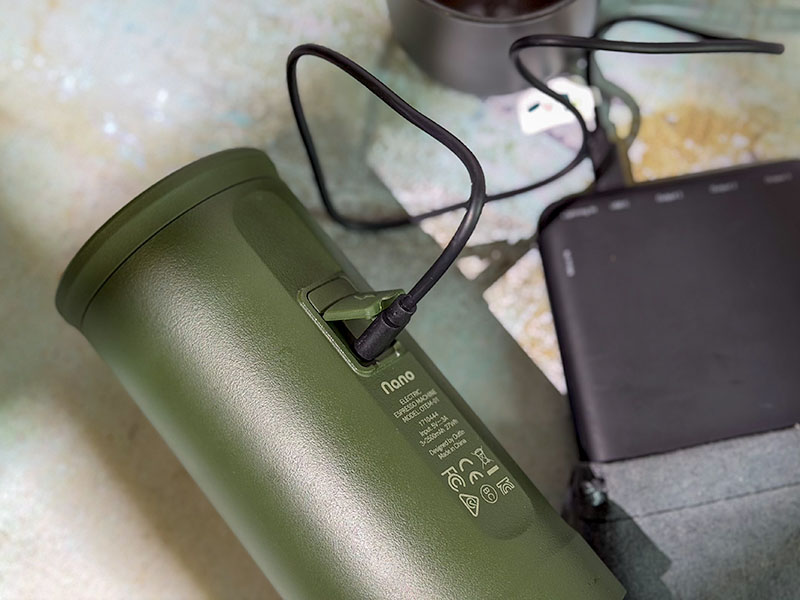
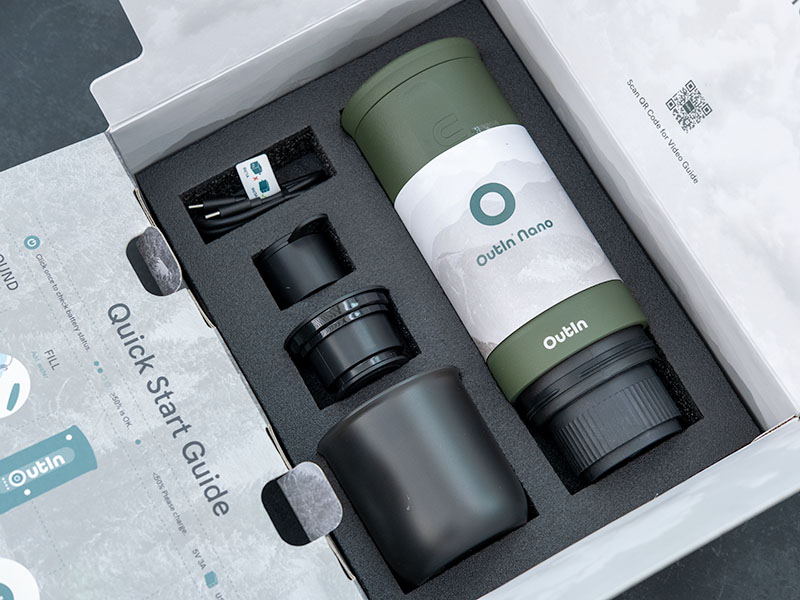
4. USB-C Charging
It charges over USB-C from the same plug, power bank or car socket you already use for your phone, so there is no extra power block to pack. On a single charge, OutIn rates it at up to 5 brews from cold water or over 200 from hot.
In reality, it’s unlikely you’ll get more than 4 brews from cold water, but that’s still pretty impressive. And we’ve not yet managed to run the battery flat using hot water.
Is the OutIn Nano easy to use?
The OutIn is incredibly simple to use with pods, slightly less so with ground coffee.
With a Nespresso pod, it genuinely couldn’t be simpler: grab the pod basket, drop the pod in, put the shower screen on top, screw it in, add water, hold the button while it heats, and off it goes. Cleanup is simply popping the spent pod out. This is the Nano at its best – and it’s the experience we’d point most people towards without having to buy any extra accessories.
With ground coffee, it’s a very different story.
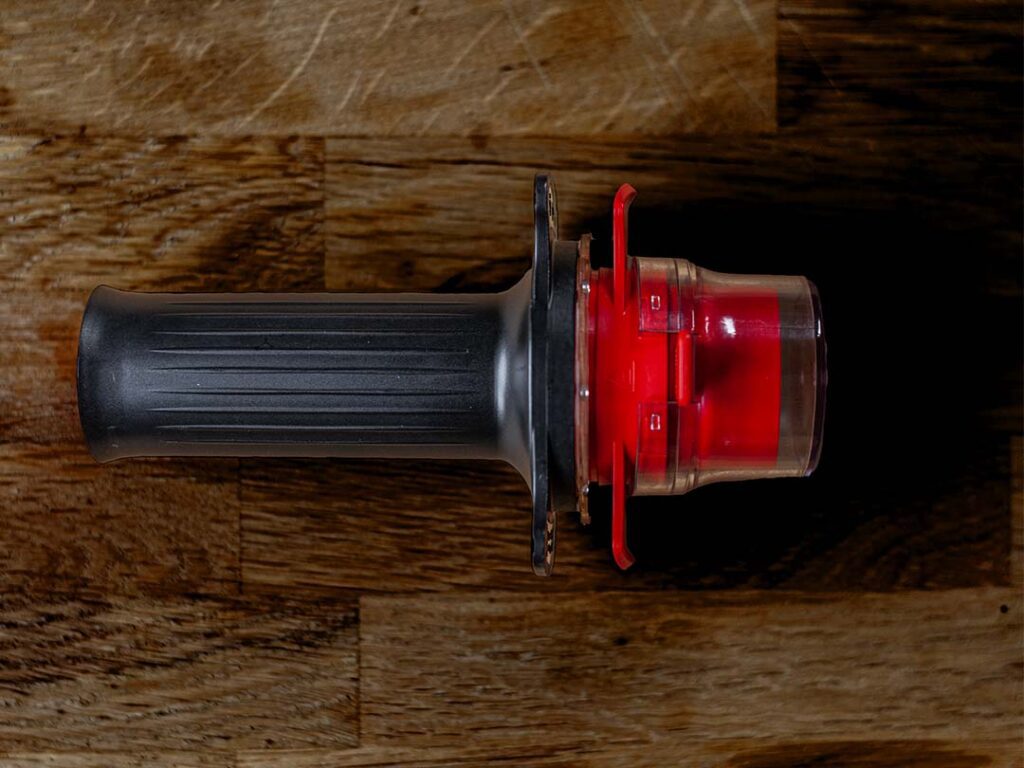
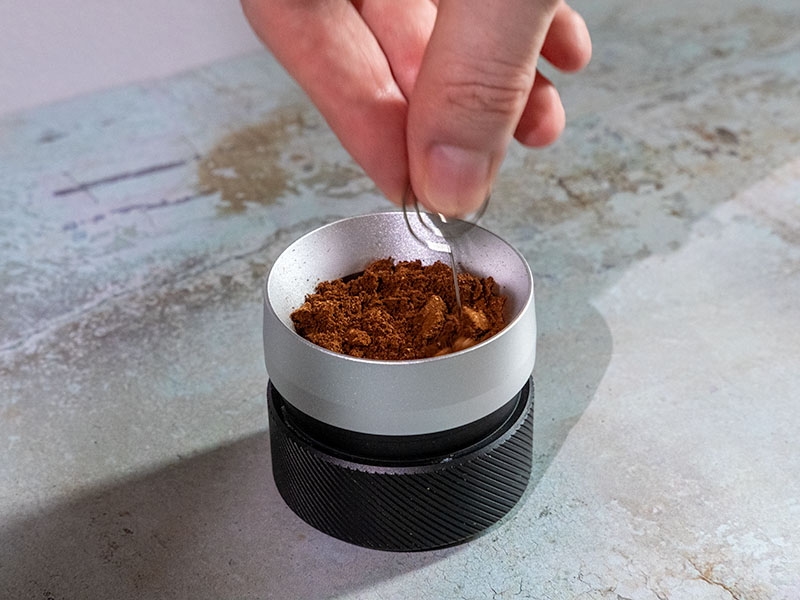
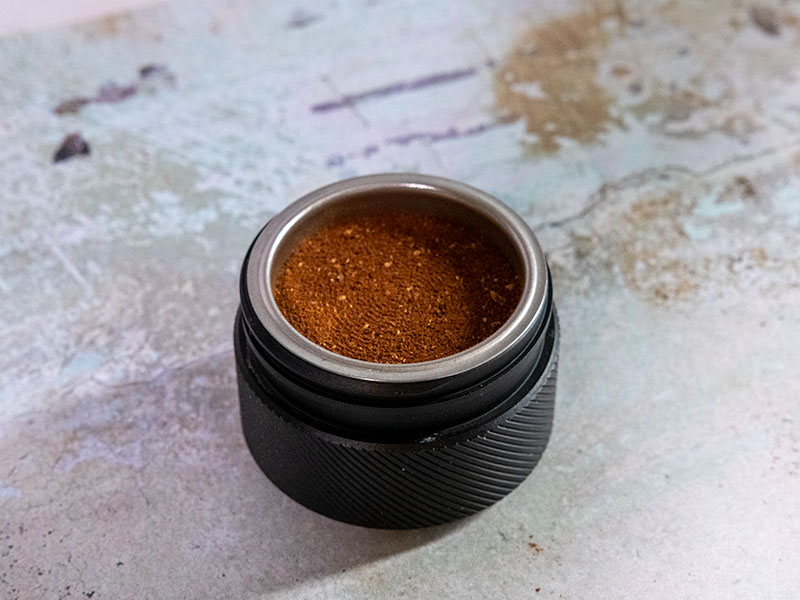
The single most annoying part is filling the small (6-8g) basket. The opening is narrow, and the grounds go everywhere if you’re transferring from a grinder cup. We ended up folding a piece of cardboard into a makeshift dosing funnel, and even then, we made a mess and lost grounds every single time.

It’s easier to use preground if you can get the nicely designed scoop right into the bag and fill it to the top. It then fits perfectly into the basket for no mess.
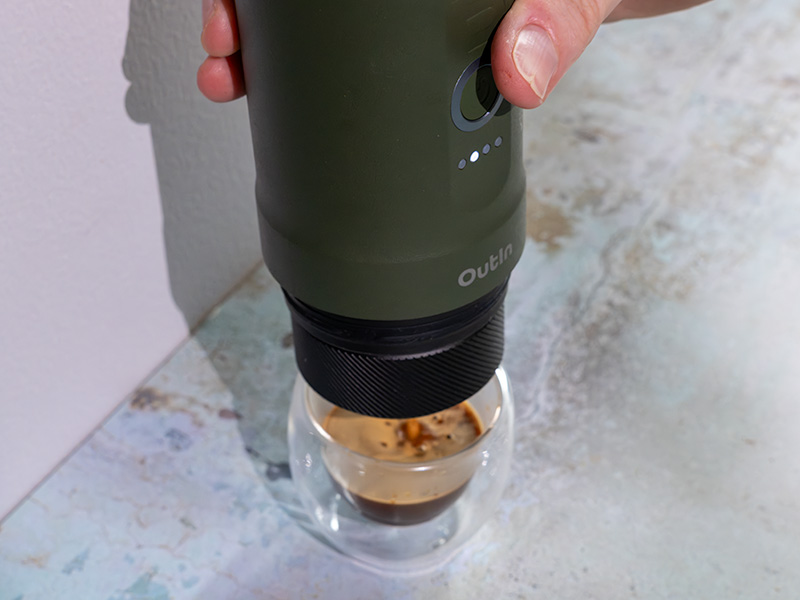
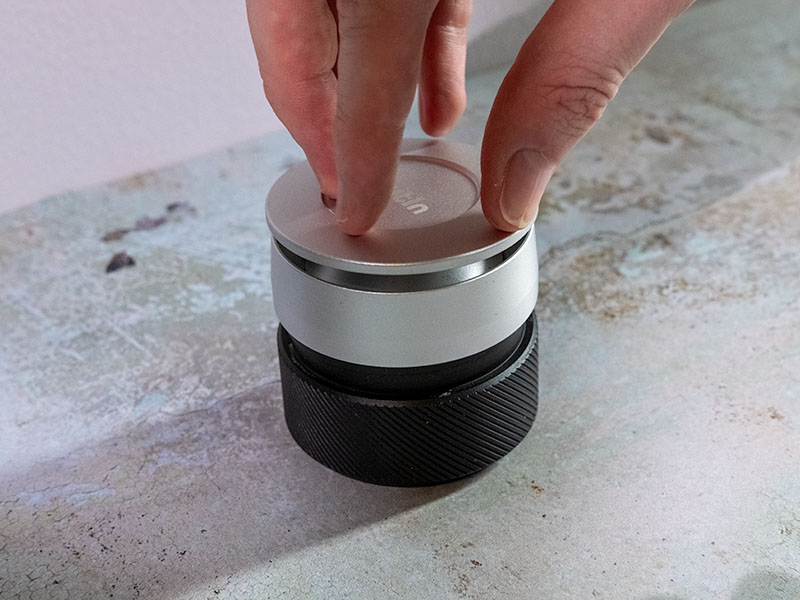
When we first started testing and dialing in, the Nano jammed on us a lot, and unscrewing it again afterwards was stiff and awkward. When you’re trying to make small grind adjustments between shots, having to wrestle the thing apart each time wears thin quickly. We even had to put the basket part of the machine in ice water once to get it apart.
There is one fix for nearly all of these problems: the Outin Nano Basket Plus add-on.
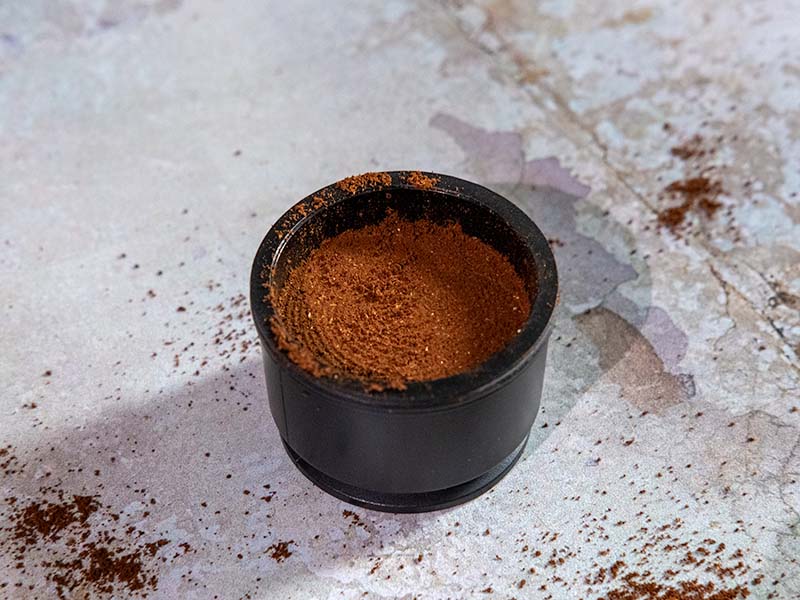
For an extra $40, you get a setup that holds more coffee (16-18g, so 10g more), is easier to fill, easier to tamp, brews better, and is easier to clean. If you want the best-tasting espresso shots, especially if you are grinding your own coffee, treat it as a non-negotiable part of the purchase.


How good is the Espresso?
The espresso from the OutIn Nano is passable, but a long way short of good. But, with the larger basket, it can pull impressively good shots.
We have to split the Nano’s espresso quality into 3 distinct use cases:
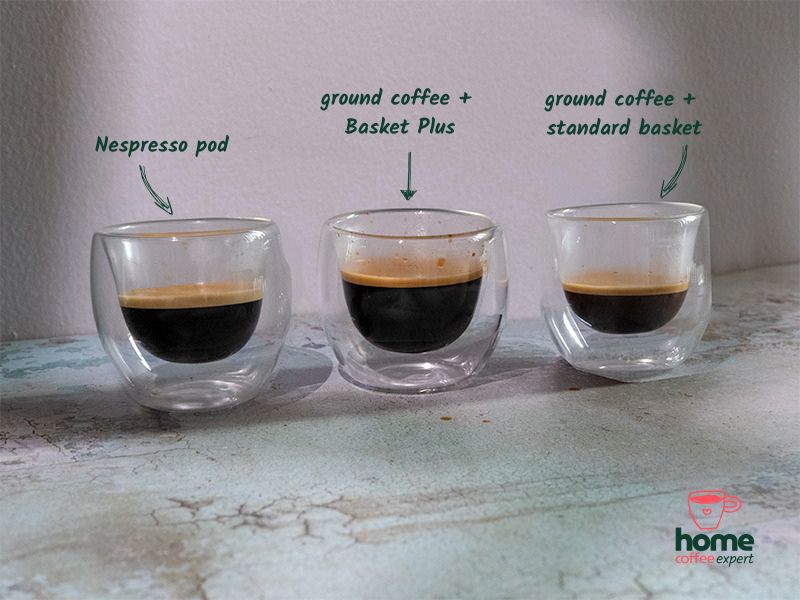
➡️ With pods, the espresso is reliably decent: quick, clean, and exactly what you’d expect from your chosen Nespresso pod. Just made somewhere a normal machine could never go.
➡️ Using ground coffee in the standard basket, it’s fair at best. Our shots landed a little bitter but acceptable, carried by a nice crema thanks to the pressurized basket. The tiny 6g dose holds it back, and lighter roasts were a write-off. You certainly wouldn’t be gushing about how good your espresso tastes.
➡️ Fit the larger basket, and the espresso becomes very good – something you would be genuinely happy to sit and savor. The larger dose (16-18g) finally gives the shot some body, and the unpressurized basket brings out more nuance. The upgrade makes all the work dialing in feel worth it.
Using medium or light roast beans with the standard basket is nearly impossible. We either got nothing out or watery, sour, undrinkable shots.
The Basket Plus can handle medium roasts. With a slightly finer grind (setting 1.5.1 on the 1Zpresso J Ultra), we got 35g out in 40s (after 10 shots of dialing in). This is slower than would normally be ideal, but the shots were rich and relatively complex with decent balance – the extra time is needed to get good extraction. Not as good as with the medium-dark roast, but very passable.
Everything works better, more consistently, and delivers better espresso quality when you preheat the whole system. This isn’t very helpful advice if you’re using the Nano to heat the water, as you’ll waste nearly 1/3 of the battery just getting it ready. But if you’re using it with hot water and want the best possible results, run a shot through with no coffee to get everything up to temperature before pulling your first shot.
Our OutIn Nano Settings
These are our best settings using the standard basket that comes with the Nano:
- Grind setting 1.3.5 on the 1Zpresso J Ultra grinder
- 6g dose, light tamp
- Water straight off the boil
- We got 20g out in 18 seconds
Every attempt to get closer to a proper 1:2 espresso ratio tasted awful – the closer we got, the worse the espresso. Going for something longer was the sweet spot for flavor.
This was using medium-dark roast single-origin beans. We weren’t entirely happy with the finished result – it was very one-dimensional. The espresso was a little bitter but still had some brightness and chocolate notes, so this was definitely the best we were getting.
It also took around 15 tries before we finally settled on this, so be patient.
We kept jamming the OutIn by tamping too hard, which made it really difficult to unscrew. There was absolutely no way Katie and her small hands could get it open again. It really only needs a light tamp, way lighter than you’d expect.
We also tested with the Basket Plus add-on:
- Grind setting 1.5.7 with the 1Zpresso J Ultra
- 17g dose
- 70ml water straight off the boil
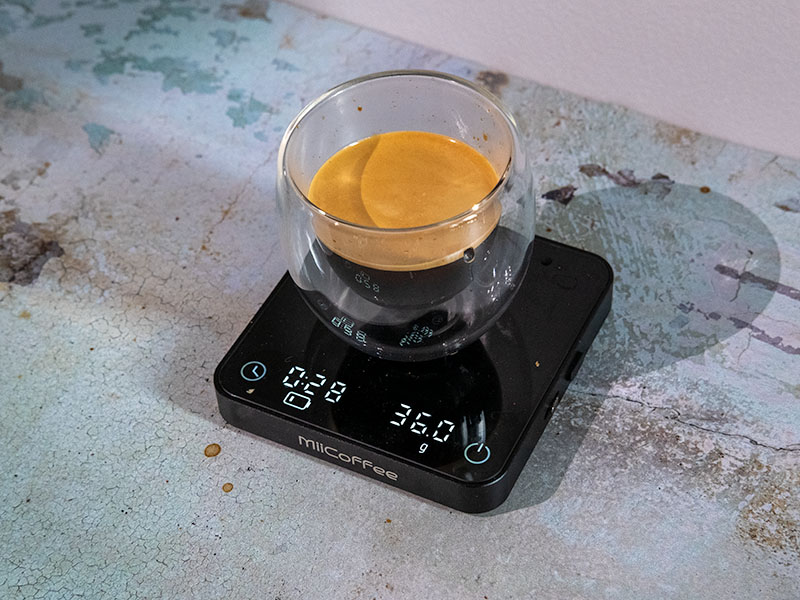
- This consistently got us 36g in around 28s
This was a much richer, fuller espresso with nice balance and clearer fruit and nut notes. It was seriously impressive for a handheld espresso maker.
We also didn’t run into the same issues with jamming the machine nearly as much. The Basket Plus set includes a WDT tool, dosing funnel, and tamper that work really, really nicely.
On both flavor and ease of use, I was so much happier using the larger basket than the included smaller basket.
Should you use Pods, Pre-ground, or Whole Beans?
The beauty of the Nano is its flexibility to use pods or grounds. What varies is the taste and ease.
In order, the easiest way to use the OutIn Nano is:
- Coffee pods
- Pre-ground
- Grinding your own beans – it’s a headache without the larger basket
But for the best quality espresso, there’s only one choice: using the larger basket and grinding your own beans fresh.
Since this is supposed to be a travel espresso machine, the lightest options need to work really well. The pod basket works perfectly well with Nespresso’s Original line pods (or any others of the same design). It’s really easy – pop the pod in, screw it in, add water, done. Clean up takes seconds, and you can go again.
Using pre-ground coffee is also pretty simple if you can pack a full bag of it. The scoop is nicely designed to fit inside a lip on the basket so you can fill the scoop, place the basket on top, then flip. The bottom of the scoop doubles as a tamper, and off you go. The espresso will be drinkable… that’s about the best I can say.
Using freshly ground coffee will result in the best flavor (that’s true of any espresso maker). But with no dosing funnel, getting the grounds into the standard basket is a real pain, and I always got coffee everywhere when trying. Even after 30 shots, I never found a way to do it without spilling coffee everywhere.
Design and Build Quality Review
The Looks
The Nano is a tidy, cylindrical machine that looks more like a travel flask than a coffee machine, which is exactly the point. It comes in a few different colors, which is always a nice thing. Nothing about it shouts for attention, and on a hotel desk or a kitchen counter, it just looks like a smart water bottle until you know what it is.
There’s not much to it really, not looking awful was the bar and the OutIn Nano clears that comfortably.
It’s also not too big. At just over 9 inches high with a diameter of just under 3 inches, it’s not taking up an excessive amount of room in your bag. That said, it’s also not the smallest portable coffee maker on the market.
The Build
It feels solid in the hand and, crucially, it’s not too heavy. At just under 1.5lbs (670g), it is light enough that you will actually pack it rather than leave it at home, which is the real test for anything billed as portable.
The one build niggle is the threading for screwing in the filter baskets. If it jams during brewing, unscrewing the chamber can be nearly impossible. There’s no way someone with smaller hands or not great grip strength would get it unscrewed without tools. (Putting it in cold water and giving it time to cool helps.)
Far from a deal breaker, but you wouldn’t want it to jam on you during a camping trip.
It feels like you could drop it a few times and it would still work. Or it can be bounced around in a backpack for years without any adverse effects. It’s been bouncing around inside our bag for a few weeks as we take it places to test, and we’ve had no issues.
Cleaning and Maintenance Review
Very simple when you use pods. A little more work than we’d like with ground coffee.
The spent puck comes out wet and is awkward to knock out cleanly if you try to do it straight after brewing. This is a big annoyance if you’re stopping for a quick coffee on a hike, for example, and don’t have time to wait for it to cool. The wet puck also leaks if the device isn’t upright, so you can’t just throw it back in your bag and clean it later.
If you’re using pods, then it works like an absolute dream. Pod out, next pod in.
A realistic cleaning schedule looks like this:
Daily: Pop out the spent pod or knock out the puck, rinse the basket and chamber with clean water, wipe the outside. We’re talking less than a minute.
Weekly: Give the basket and chamber a proper wash to clear any oils and fine grounds, especially if you have been using darker, oilier roasts.
Periodic: You’ll need to descale every 1-3 months, depending on water hardness. You can run hot water and vinegar through the machine to do this.
The larger basket is easier to clean than the standard one, which is one more quiet point in its favor.
The Competition
There aren’t a lot of portable espresso makers that heat the water for you, making choosing between them relatively straight forward.
Wacaco Pixapresso
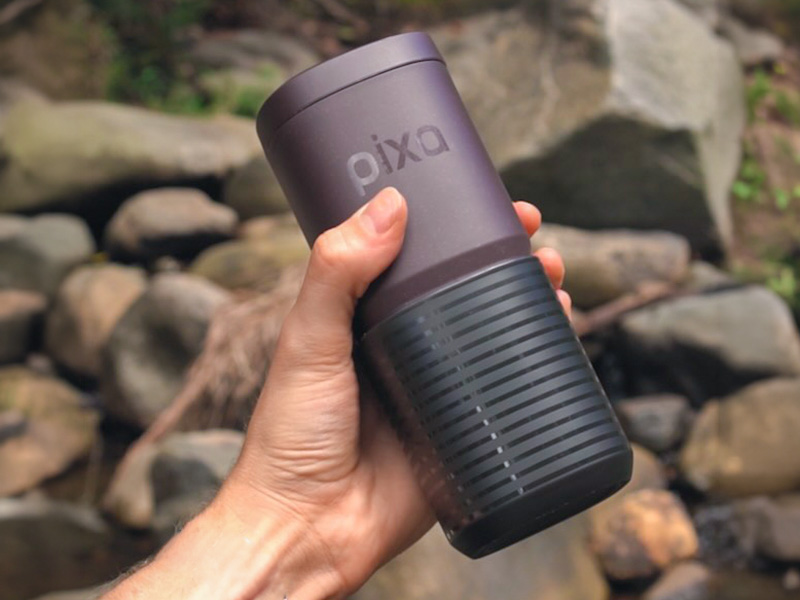
If you’re serious about espresso and the Nano’s stock basket has put you off, the Pixapresso is the better device.
It offers different extraction modes and comes with a pressurized or unpressurized basket as standard. This is much better for someone hoping to get truly excellent espresso shots anywhere – we were really impressed by the flavor. For roughly the same price, it gives you the control that the Nano holds back.
By the time you pay for the Basket Plus and the Nano, it’s actually more expensive than the Pixapresso ($190 vs $160).
The trade-off is that the Nano is still the easier, more grab-and-go option, particularly if pods are your thing. What you gain in control and flavor, you lose in ease.
It weighs 3oz (85g) less, so hikers counting that weight will want the lighter option.
We’d pick the Nano if you want to drop in a pod and have espresso on a hillside. But if you want to actually control your shots, we think it’s worth spending the money for the Pixapresso.
OutIn Mino
If you like the sound of the Nano but the small stock basket has put you off, the OutIn Mino is the obvious sibling to consider.
It’s smaller, faster to brew, gets more shots per charge, and comes with a bigger basket as standard (holding 12-13g vs the Nano’s 6-7g). On paper, that fixes the exact thing we complained about most with the Nano.
Honestly, if you care about coffee quality, we would still take the Nano with the larger basket fitted rather than the Mino. It’s cheaper, and we’ve always gotten better coffee from it due to the larger dose.
The Mino is only worth the extra money if the extra battery life or smaller size will make a material difference to you. More coffees on hikes, or less weight to carry. For most people, it’s probably not worth it to save a few ounces or a little space.
The Verdict
You want a portable espresso machine for your pods? This is fantastic.
The OutIn Nano is a likeable little machine that is more than capable of making espresso anywhere… to an okay standard. For pod drinkers, it’s close to a no-brainer at $150: easy to use and clean, lightweight, heats water, is reliable, and has a decent battery life. This alone will make it ideal for many people.
The catch is the ground-coffee experience on the standard basket, which is fiddly, jam-prone, and never quite worth it. The good news is that the larger basket at $40 extra fixes nearly every complaint we had, turning a frustrating setup into a good one.
We went into this OutIn Nano review expecting to be disappointed. But we were pleasantly surprised – once we had the right setup.
The big takeaway for us is: decide upfront whether you’re a pod person or a beans person. Team Pods – buy the standard Nano and enjoy it. Team Beans – buy it with the larger basket add-on, or get the Pixapresso instead.
Convinced that the OutIn Nano is the one for you?